
Slot tracking
How to use video: https://www.loom.com/share/077dc7b5d11e4bfe907e2f978bcdb1a5
When do you need this
When you tend to default to FIFO operations during busy periods or seek tools to help you stick to your transport planning process.
When you have frequently late arrivals and it is hard to prioritise the visitors that arrived on time over the ones that arrived late.
It also provides you with clear insights within Peripass about late arrivals and late dispatches.
Main idea
Save a start and end slot on a visitor.
Define an ideal arrival window and an ideal dispatch window, relative to the start of the slot. E.g. Ideal arrival window is within 1 hour before the slot start until the actual slot start.
Visual indicators and automation help you to timely dispatch the visitors that arrived on time.
How to use
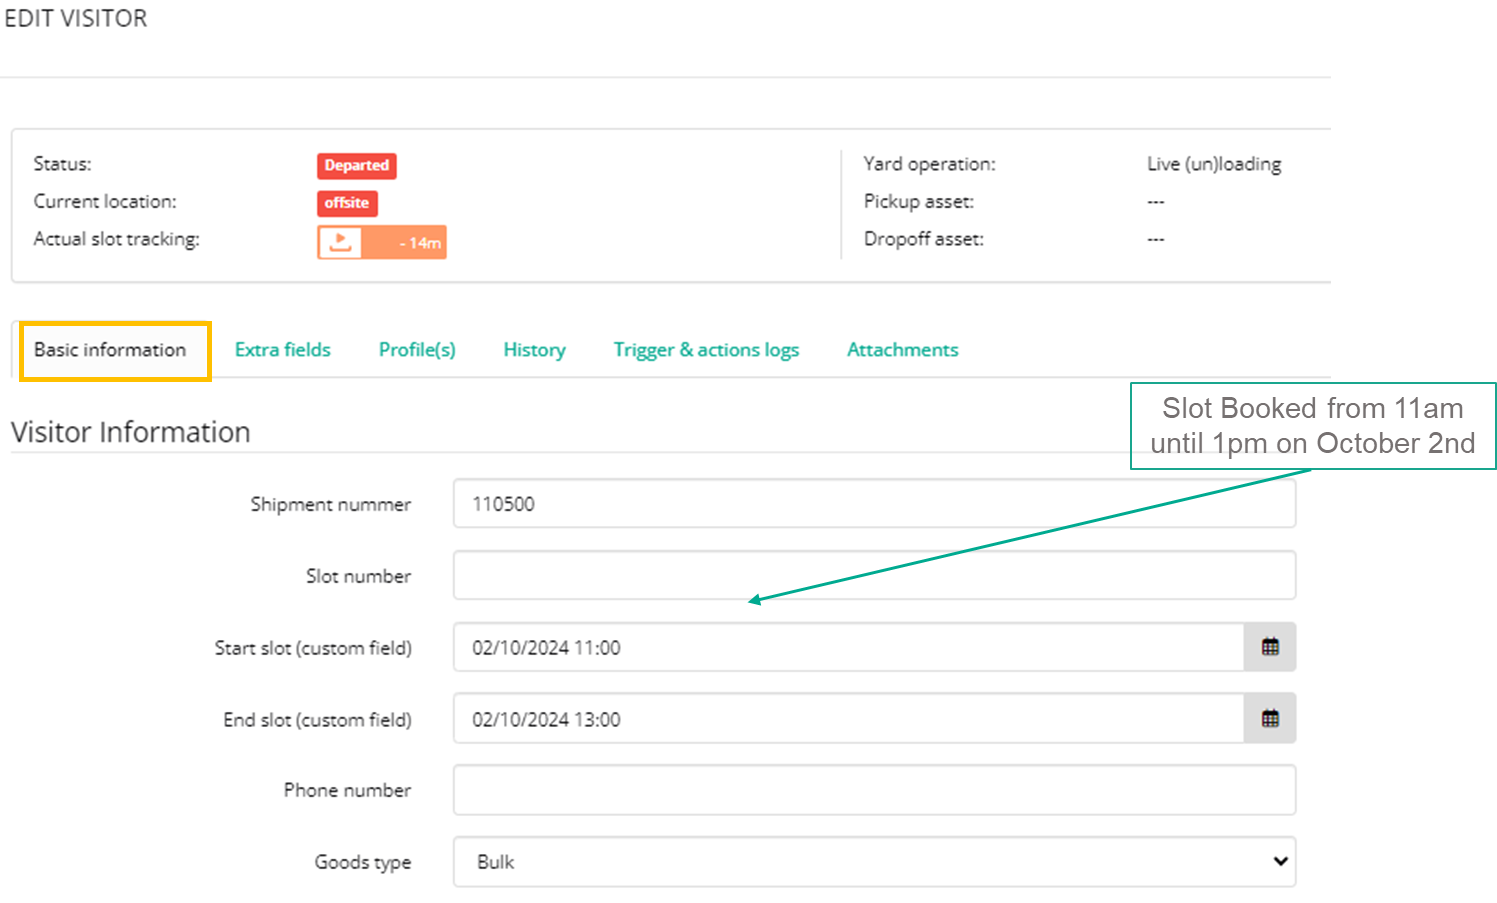
Add a start slot and end slot to your visitor
During visitor creation (for more info, please check the page: Create, view and edit visitors ), booked slot can be defined with its Start and End Slot (end is optional)
Enable slot tracking in the visitor overview
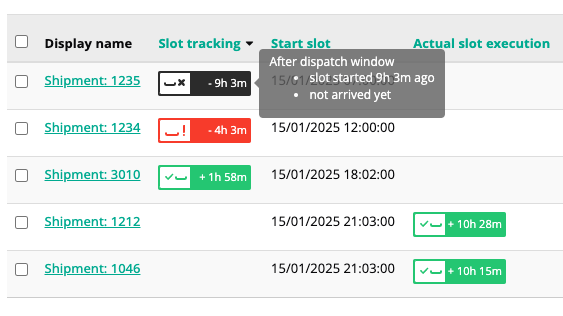
Enable the column Slot tracking and Actual slot execution in your visitor overview by clicking on the black button on the top right of the table.
Hover over the slot tracking badge to see more information about the slot tracking.
Once a visitor is dispatched (status CHECKED IN or later), the slot tracking will no longer be displayed. Instead, the Actual slot execution is showing the status of slot tracking at the moment of dispatch. In other words, it shows how much before or after their slot the visitor was actually dispatched.
Note: Arrival time is the moment a visitor has arrived: Finished the registration or transitioned to one of the following states: Waiting for Approval, Waiting for Sequence or Waiting Dispatch (or also Checked-in, if the visitor gets this status directly from Expected).
Enable slot tracking on the dispatch dashboard
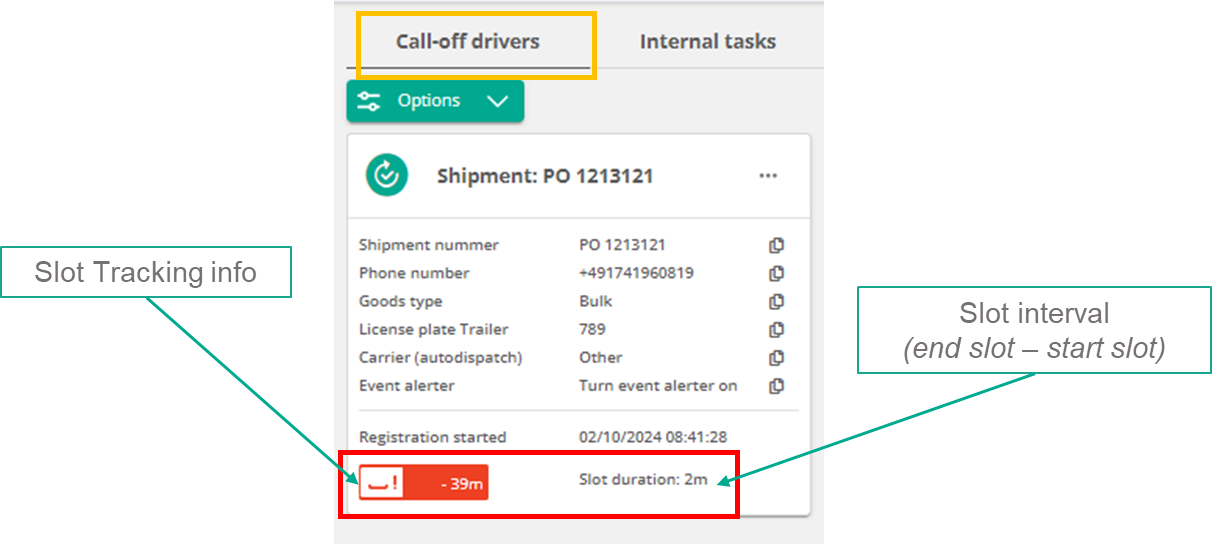
Slot tracking should be enabled by your admin and be shown at the bottom of each card in the waiting queue.
To enable this, go to Configuration > Dispatch dashboards > Edit > Basic information tab > Virtual yard layout configuration section and enable the Show slot tracking of visitors in the waiting queue setting.
Different slot tracking states explained
The following slot tracking options are possible:
Status | Explanation |
|---|---|
To early  | The visitor is currently before their arrival window. Thus: the time until the start of the slot exceeds the allowed window to arrive. |
In arrival window  | The visitor is currently in their arrival window. Note: an arrival window can be negative. E.g. You can choose to allow drivers to arrive up to 30 minutes late. |
In dispatch window  | The visitor is currently in their dispatch window. Note: a dispatch window can be negative. E.g. You can choose to allow drivers to be dispatched up to 30 minutes late. |
Past dispatch window - on time arrival  | The visitor is currently past their dispatch window AND the visitor arrived on time. The color is red as for these visitors you will be paying waiting fees. |
Past dispatch window - late arrival  | The visitor is currently past their dispatch window AND the visitor arrived late. The color is black as for these visitors you won’t be paying waiting fees. |
Unplanned  | The visitor has no start slot configured, while this would be expected based ont he profile. |
Another way to visualise this:
Automations that use slot tracking
Automatic dispatching
Visitors can be auto-dispatched to a yard location depending on its dispatch window (before, in or after). For more information about Dispatching, please check the page: Automatic Dispatch .
Queue capacity management
Visitors can be sent to nearby queue or remote queue depending on its arrival window (before, in or after). Fore more information on Queue Capacity management, please check the page: Queue capacity management
Your own triggers & actions
Other Action & Triggers (e.g.: Send specific SMS) can be sent depending on Slot Tracking. A use case might be to refuse registrations for early arrivals. In this case, once the registration is complete, you run a Trigger to evaluate the arrival window. If the driver is too early, you reset the visitor to expected and you inform the driver to come back later.
How is Arrival Time determined?
The arrival time is the moment a visitor has arrived. We define this as follows:
Either the moment the visitor finished the registration.
Or when the visitor transitioned to WAITING APPROVAL, WAITING SEQUENCE, WAITING DISPATCH or CHECKED IN directly from EXPECTED (e.g. by skipping the registration).
This means the arrival moment will be reset when a visitor is reset to EXPECTED.
Won’t do
Advanced rules and logic for queue capacity management. E.g. decide the queue based on the product type or the day of the week.
How to set up
Link the Slot Start and Slot End fields to your profile via Configuration > Profiles > Edit > Linked fields.
You could use any date and time field, however we strongly advise to use the pre-provided fields.
Enable slot tracking on your profile via Configuration > Profiles > Edit > Slot tracking configuration tab.
You can have different arrival and dispatch windows per profile.
Warning: the UI is confusing as a duration is asked.
Thus…
From 1 hour before start slot
Until 10 minutes after start slot
… should be provided in the configuration as:
From 1 hour before start slot
For a duration of 70 minutes (which calculates to a duration until 10 minutes after start slot)
Set up an integration
Please refer to Public API & Integrations for more information on how to set up an integration. Note that you can change the technical name of the pre-provided slot start and slot end fields to match any name of you existing system.