
Weighing Automation
Initiate a Weighing
There are 4 ways to initiate a Weighing
Initiation | Description | Required setup | Use for |
|---|---|---|---|
Weighing as part of Registration | The weighing will be started immediately as last step in the registration process. | A kiosk available on the Weighing System. | Low traffic sites. Weighing system in front of site entry. |
Separate Weighing on Kiosk | The Visitor uses dedicated Weighing Button SSK and then identifies with:
Options will be provided based on profile settings. At the end of the weighing the customer can communicate extra routing information to the driver. | A kiosk available on the Weighing System | 2nd weighing on a Weighing System where SSK is in place. |
Weighing as part of Check-out | The weighing will be started as first step in the check-out process. | A kiosk available on the Weighing System. | Weighing system at site exit in combination with document signing/printing on check-out. |
ACS door | The visitor uses his pin-code or badge on an ACS door. This triggers the Weighing process. | Pin code or badge reader available on the Weighing System. | All except above |
Where to configure: The allowed initiation of a weighing can be configured per profile, per weighing system. Navigate to Profiles > Weighing configuration > Weighing systems
Multi-step weighing
Currently Peripass supports following weighing processes:
Weighing Flow | Business Logic |
|---|---|
1 Step weighing |
|
2 Step weighing |
|
Where to configure: The weighing steps can be configured in the Weighing configuration, under Profiles.
Process steps
Weighing automation allows you to configure your site-specific Process Steps.
Map all the flow surrounding a Weighing of a Visitor and create Process Steps, Transitions events, and Transition actions. Keep in mind that fewer process steps are better. If a process Step has no Transition Action and no Allowed weighing differentiation, it is probably not necessary.
It is possible to automate actions using the “Process Step Changed” Trigger from Triggers & Actions.
A very simple Weighing Process Step could look like this:
Process Step | Allowed Weighing | Transitioned after | Result of transition |
|---|---|---|---|
Ready for 1st Weighing | 1st | On creation | |
1st Weighing Done | - | After 1st Weighing | Set Visitor to “onsite” |
Ready for 2nd Weighing | 2nd | After (un)loading completed | |
2nd Weighing Done | - | After 2nd Weighing | Check-out visitor |
Weighing Failed | - | On Weighing Error |
Process Steps can be used to introduce extra steps required to do weighing. A typical example is a cleaning to be performed before the weighing should be allowed.
Where to configure: Create a custom field of the type Process Step and link in the Weighing configuration under Profiles. f the process step is used in a weighing, do not directly link it to a profile (as it will show up in the visitor anyhow).
If a Peripass Visitor has no Process Step (e.g. when he was created using the API), the weighing automation will default assume the Visitor is on the first Weighing Step.
Weight fields
Weighing automation requires weighing fields.
Apart from the configuration, they behave exactly the same as other custom fields, thus you can read and update them using all other features (e.g. API integrations)
Where to configure: You create these fields as custom fields and link them to a profile through the Weighing configuration under Profiles: Configuration > Profiles > Edit profile > Weighing configuration: select the weighing field under “Workflow”. The custom fields should not be linked to the profiles:
the net weight will show up in a dedicated area under “Basic information”.
The first and second weight will not be shown. If this information is still required, it can be shown by linking the fields to the visitor, as described here: Visitor profile | Linked-fields
Official weight alibi
Peripass wil always perform an official weighing, including saving an alibi. The alibi is always saved in the local history of the visitor.
As this official weight reference may be necessary for weighing bills or official documents, such as waste registers or transport registers, this reference can be mapped to a custom field, facilitating its reporting back to host systems through the use of autofill fields.
🖥️ How to configure?
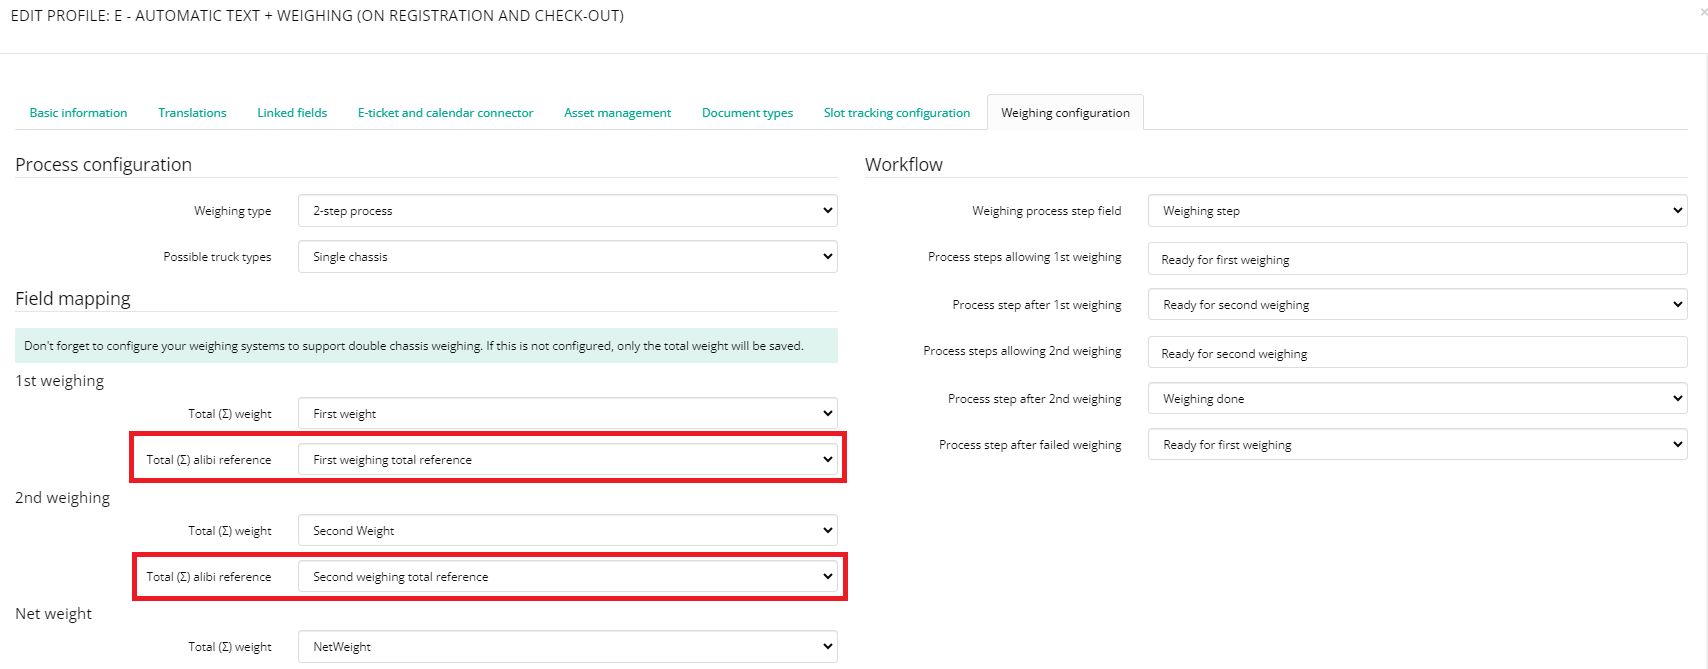
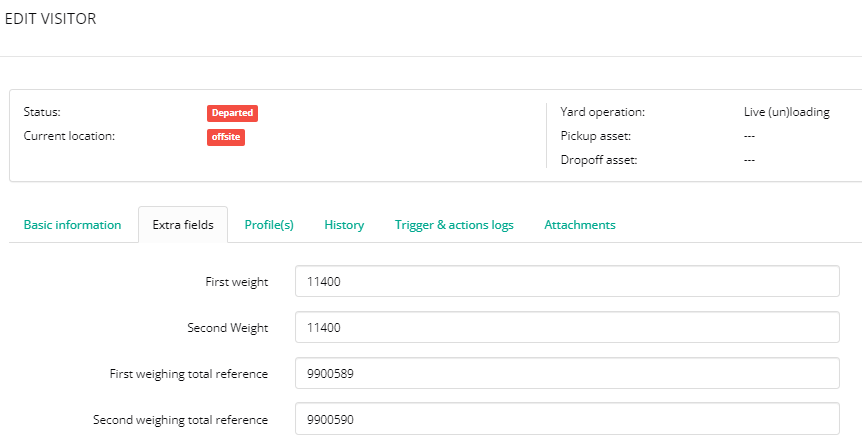
Mapping the reference on a custom field
Result: reference saved as extra field on visitor
If no official weight can be captured, Peripass will retry the operation.
Tractor-Trailer weighing
Some customers have one weighing indicator coupled with a double platform to support the weighing of a truck and its trailer simultaneously:
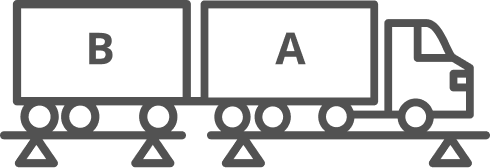
Instead of saving a single net weight, we store a net weight for each platform, as well as a total net weight.

Net weights
The results of individual weights are stored in the extra fields, both per platform and for the total weight
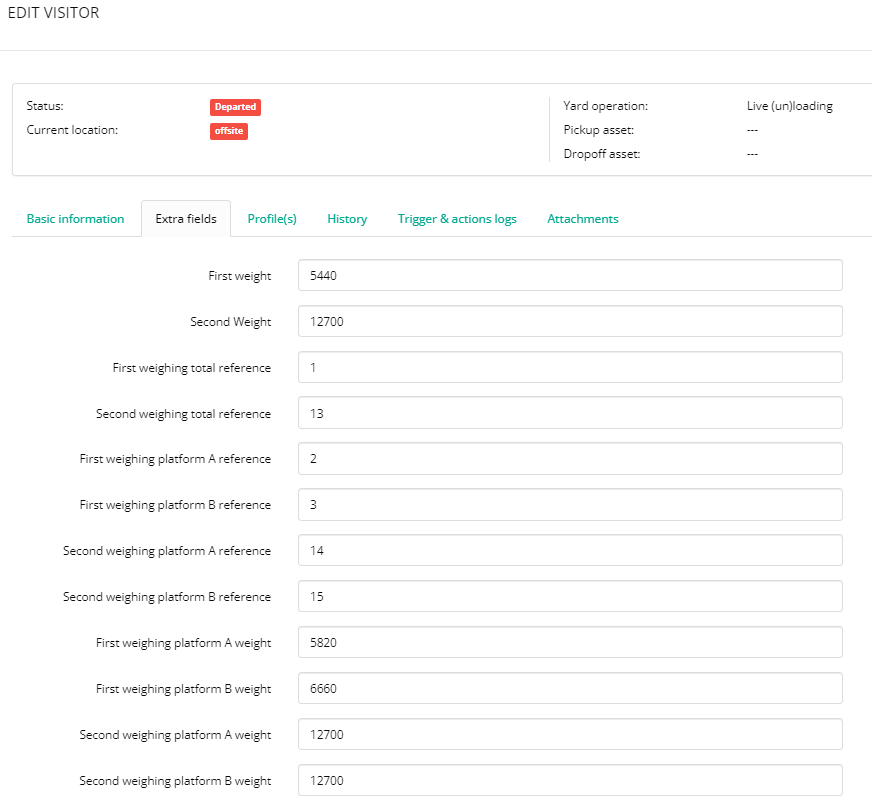
Individual weights in extra fields
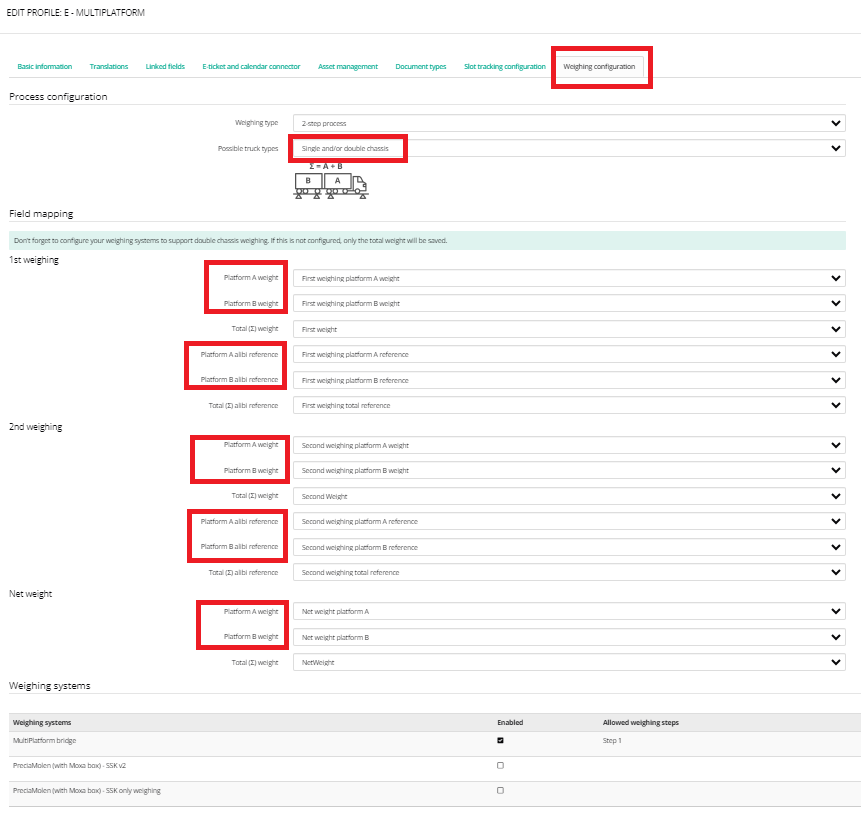
🖥️ How to configure?
On the ‘weighing configuration' tab of the profile, you need to set possible truck types to 'Single and/or double chassis.' Consequently, you will be able to map the different custom fields that should be assigned to capture the platform weights and optionally its associated official reference.
Automate local hardware
Triggers & actions can be used to automate local hardware on a Weighing System.
Trigger: “ … when one of a visitors’s process steps changes”
Condition: “Last Weighing System Visited”
Based on these conditions local hardware such as a ticket printer can be addressed.
When using a weighing system with a pin pad: Grant the visitor access to the correct ACS door + communicate the PIN code in a text message won’t happen out of the box. This should be configured using Triggers & Actions.
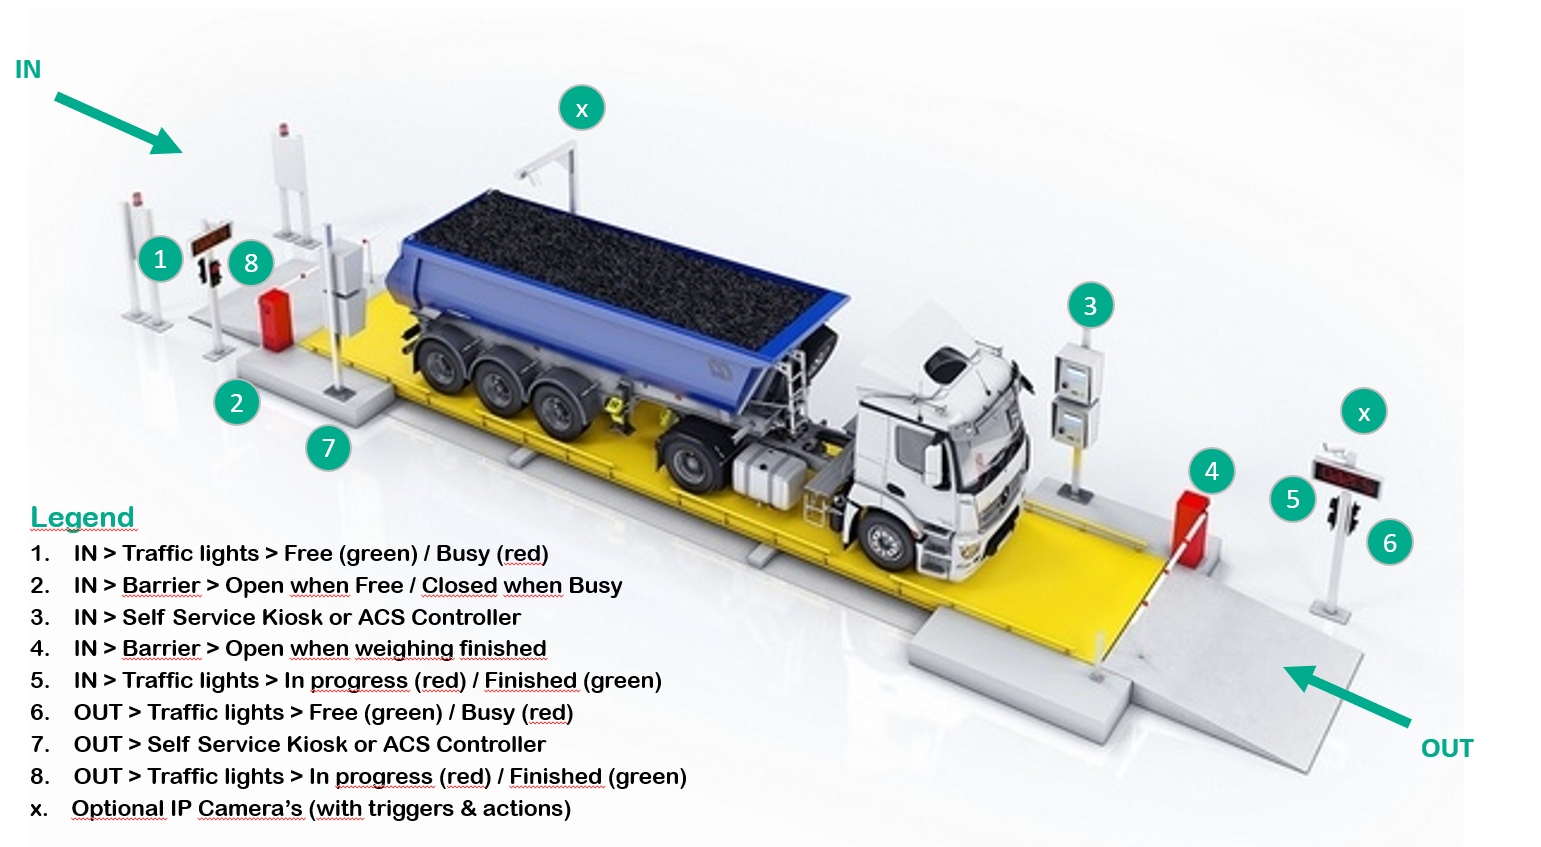
Traffic Flow
Weighing automation can also automate the traffic flow for a weighing system. This can be configured
These are the supported traffic flows and how they work:
Traffic Flow | Principle | Use case |
|---|---|---|
One-way standalone | Start situation: Entry barrier and traffic light green, exit barrier and traffic light red. During Weighing: all barriers closed, all traffic lights red After Weighing: All barriers open, all traffic lights green When system is disabled: all barriers open, all traffic lights green | A normal weighing system where one can only enter / leave from 1 direction. |
One-way Site entry | Start situation: Entry barrier and traffic light green, exit barrier and traffic light red. During Weighing: all barriers closed, all traffic lights red After Weighing: All barriers open, all traffic lights green When system is disabled: all barriers closed, all traffic lights red | A weighing system that is positioned in front of a site entry. In case of a failed or refused weighing, the entry barrier will not open. |
Two-way | Start situation: all barriers open, entry traffic lights green, exit traffic lights red During Weighing: all barriers closed, all traffic lights red After Weighing: exit barrier opens and gives green light After weighing (bis): our system polls every 5 sec for a weight, when it is lower than the threshold, the system resets to the starting position (e.g. all barriers open, all green light). When system is disabled: all barriers open, all traffic lights green | A weighing system where one can enter / leave from both directions. |
Schematic overview:
Where to configure: At Weighing automation, under Weighing system.
Exit barrier of one-way systems should always be configured to close automatically after a visitor leaves the weighing system OR after a time-out (in case the visitor left backwards).
Self Service Kiosk
The weighing consists of 2 type of translations:
Guidelines during the weighing
These translations contain all the information to guide a visitor through the self service weighing (ranging from start button names to exception screens when something goes wrong).
Where to configure: Per self service kiosk
Confirmation screens
These translations contain the message the driver sees after a successful weighing. They inform the driver about his next steps. If the driver is assigned a yard location, the confirmation screen will show the assigned yard location in a visual way.
Where to configure: Per profile
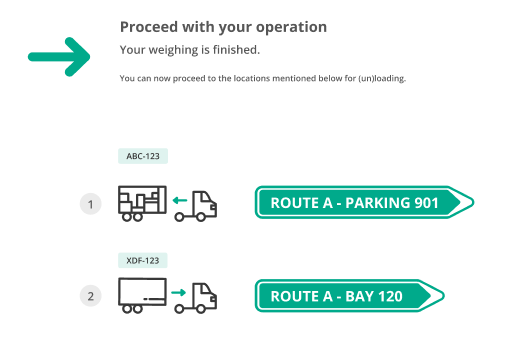
Example confirmation screen for a visitor that has been dispatched with drop off and pick up of an asset.